

I’ve recently been crafting and wanted to show with you how to make this pumpkin dupe. As a bit of a back story, I first fell in love with a particular design a couple of years ago. It was in TK Maxx, which lets face it, is the home of Halloween home decor here in the UK. Although the design was simple and understated, it came with a £16 price tag. Because I knew I wanted a matching pair, it was out of my price range.
I was walking around my local Hobbycraft shop last month and noticed that they had some lovely ceramic pumpkins in a variety of sizes. Whilst they were plain and ready for you to decorate yourself, they were also cheap and well within my budget.
An idea formed in my mind where I could create a dupe for the TK Maxx version. Here is how I got on…
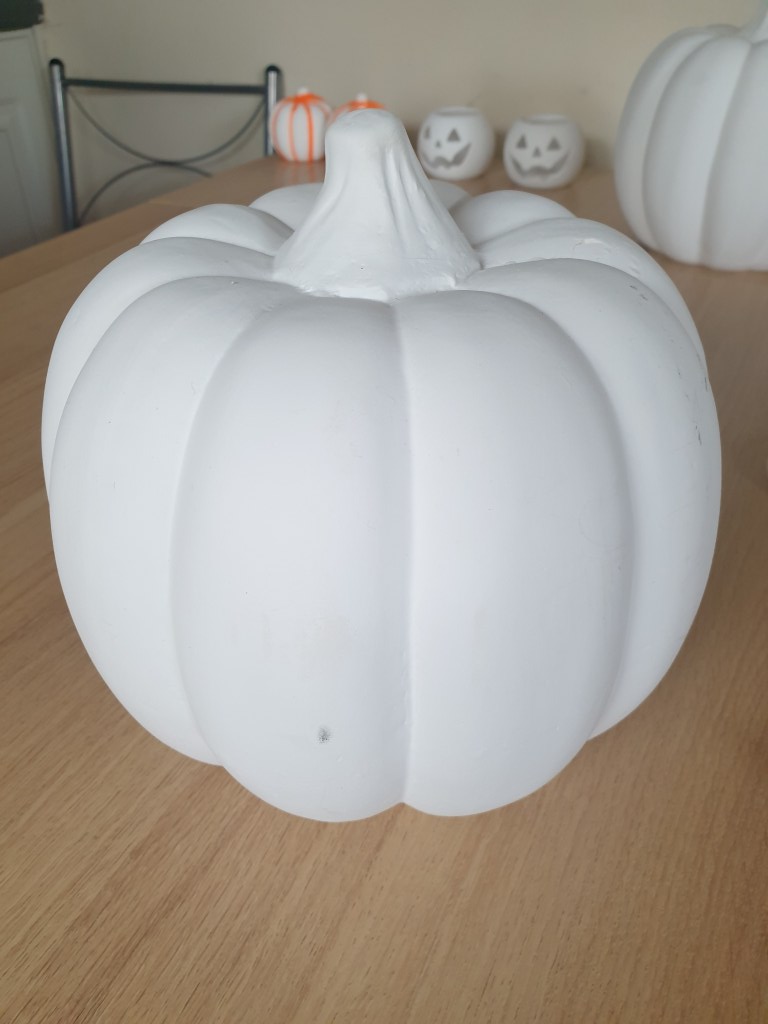
How To Make This Ceramic Pumpkin Dupe
You will need:
- Ceramic pumpkin
- PVA glue
- Glitter (Whichever colour you prefer)
- A circular template (Optional)
- Paintbrush
- Varnish (Optional)
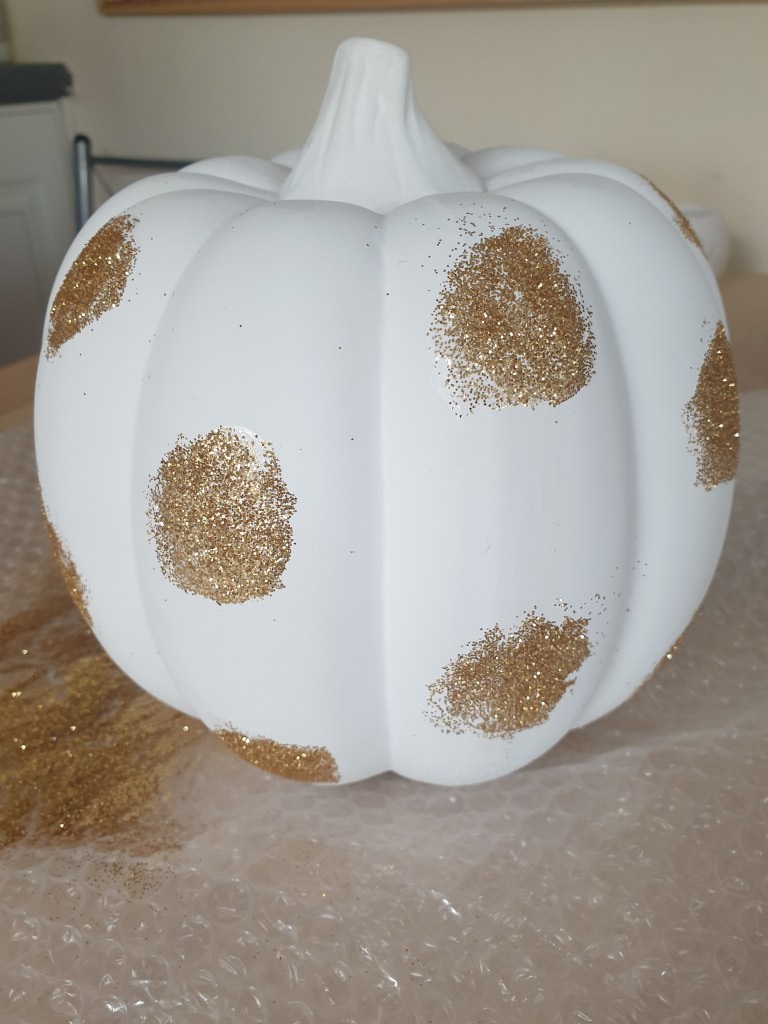
The first thing you want to do is prep the area you’ll be working in because it can be a messy craft. I also created a circular template that was actually just part of an old envelop. I wanted all my dots to look alike but if you’d prefer, you could do this freehand.
What you then want to do is pop a small amount of PVA glue into a dish. Dip your circular template in the glue lightly before pressing it onto your ceramic pumpkin. Next, you need to tip the glitter onto where you have just applied the glue. Repeat this all over the pumpkin until you get the desired look. Personally I chose to do two glue circles for each panel on the pumpkin, one higher and one lower alternating.
Once this is all done, its then time to leave it to dry. I left mine for 48 hours just to be sure that it had fully dried. Once I was happy with it, I got the paintbrush and just lightly brushed away any of the glitter that had fallen in places I didn’t want it.
The final step, which is optional, is to varnish the pumpkin to stop any fallout from the glitter. If you choose to do this, make sure you allow plenty of time for drying before you place it on display.
Final Thoughts
Overall, I am so happy with how this turned out. I saved myself so much money and had a lot of fun creating these pumpkins too. To break it down, I bought the largest of the ceramic pumpkins which were priced at £5 each. The gold glitter was only £1 per tube. Originally, I didn’t know if one tube would be enough but it was plenty. A little certainly went a long way.
I already had a large bottle of PVA glue at home, which I had been using for other crafts. Most people have a paint brush knocking around at home. This can be either an artist or a household paintbrush depending on what you have. My dad had some spray varnish which I borrowed because I only needed a small amount.
In total, this craft cost me £11 which I’m pleased with. It came in a lot cheaper than just one of the TK Maxx pumpkins and I had a lot of fun creating my own too.
What do you think?
Would you like to create your own too?
Other posts you might enjoy:
3 Simple Halloween Make Up Tutorials
Sign up to my mailing list for exclusive content, discounts and giveaways:

28 responses to “How To Make This Ceramic Pumpkin Dupe”
What a great idea! I love the thought of creating your own design on the pumpkin and think using the paper cutout and dipping it in glue is a brilliant way to keep it uniform. I really like the look of the ceramic pumpkin 😀
LikeLike
Oh I love a good DIY project and that you opted for ceramic ones so you can even reuse them as a decor in the next few years! Creating a template is such a great tip! Really need to get my hands on some of them x
LikeLike
This is a great idea, can’t wait to visit my grandma now and do this with our pumpkins! Thank you for such an inspiring suggestion 🙂
LikeLike
Oh wow!!!!!!! What a lovely decor. Love the white color and gold dust. Thank you for sharing.
LikeLike
What a fun DIY! So festive and cute. This would make a great housewarming gift in the autumn 🙂
LikeLike
What a cute project! I’m all about the glittery pumpkins. Thanks for sharing the how-to!
LikeLike
I love crafty activities especially this time of the year! Good job looks great!
LikeLike
It looks really cool. Makes a good centrepiece.
LikeLike
I love these – they’re so cute! I’ll definitely be giving these a go, the glitter sold it for me, haha! Thanks for sharing x
LikeLike
What a cute idea — I like that these can be decorated in any way and that suit our decor vibes. Thanks for this Halloween inspiration!
LikeLike
what a fun craft! i’ve been wanting to either paint pumpkins or these wooden figures i found at Target. super cute to display!
LikeLike
Ah this looks so cute, I love it. Not only did you get the fun of getting to create your own but the bonus price tag as well.
LikeLike
That’s very cute, creative and decorative. Thanks for sharing!
LikeLike
I love it when you can make something cheaper than the store bought. Also the simplistic deisgn is very effective, isn’t it? Who doesn’t love a bit of glitter?!
Thank you for sharing, you have given me some crafting inspiration!
Aimsy xoxo
Aimsy’s Antics
LikeLike
This looks so pretty! Well done on creating your own for much cheaper than buying the original – plus you know you made it yourself! Thanks for sharing.
LikeLike
This is such a cute pumpkin, what a lovely idea to create something like this! x
Lucy | http://www.lucymary.co.uk
LikeLike
This is such a cute idea! I love decorating for fall. Thank you for sharing this easy craft!
LikeLike
Hello! This is a great post!! Thanks for sharing this, I can’t wait to get my halloween decorations up! Alicia
LikeLike
I love this! I am excited to do this with my boys. Thank you for the inspiration!
LikeLike
The pumpkin is so cute & it’s great that you were able to save money & make 2 pumpkins!
LikeLike
Looks super delicious lol I want to eat it. This is a great addition to halloween decorations. Keep them coming xo
https://www.lifebeginsattwenty.com/
LikeLike
I love ceramics, so thank you for sharing this craft idea 🙂 I love it!
LikeLike
I love this! You can get things like this in shops which are SO overpriced when you could make a version just as good yourself.
LikeLike
Ahh this is such an amazing craft idea! Definitely going to try this!
LikeLike
This is an amazing fall craft and I love how easy it is to do! The pumpkin looks jazzed up, classy, and eye-catching. 🙂
LikeLike
[…] Halloween inspired post of the year. If you haven’t seen it already, head on over to find out How To Make This Ceramic Pumpkin Dupe. I wanted to get creative and make a few decorations for my home and so I am back with another […]
LikeLike
[…] have already posted about How To Make This Ceramic Pumpkin Dupe in which I used the two larger ceramic pumpkins I’d bought from Hobbycraft. I used the wool I […]
LikeLike
[…] How To Make This Ceramic Pumpkin Dupe […]
LikeLike